- Go to Marketing Cloud and navigate to the Email Studio application.
- Click on the "Interactions" tab and select "Import".
- Select Create
- Name (required) - Name your Data Extension
Hot Tip: To make it easier to find later, use a naming convention Sample Naming Convention - External Key - will be autofilled (do not fill this in)
- Description - Give this DE a description that will help you remember how to use it in the future.
- Under File Location (required) select dropdown to > Salesforce Objects and Reports
- Under Salesforce Data Source Type, select Report
- Press [Select] (wait for the popup)
- Type the name (or a partial name) of the report you inend to import and click [FIND NOW]
- Select the checkbox for the Salesforce Report you wish to import the data (UCSF Insider June 2023) and press [OK]
Map your import info
- Map the fields in the Salesforce report to create corresponding Columns in Your Data Extension.
- Note: Your Salesforce Report MUST include Email and Salesforce Contact ID 18. If it does not, return to PACE and update your report to include these display columns.
-
For tips on what to use, see DE - Field Mapping Tips in right column ►
-
- Note: Your Salesforce Report MUST include Email and Salesforce Contact ID 18. If it does not, return to PACE and update your report to include these display columns.
- Choose your import options, such as how to handle duplicates and whether to update existing records.
- Under Import Completion Settings Select the checkbox labeled "Send notification email to" and input your own email address. This will prompt Marketing Cloud to email you when the Import ins complete and report to you any errors.
- Press [SAVE] at top of page.
Run your import
- Click on the "Interactions" tab and select "Import"
- Locate your recently saved Data Extension and select the checkbox next to the title
- Press the [► Start ] button
- You will receive an email when the import is complete
Update your data Extension
- Open your data extension and select [Edit Fields]
- Change the field named Salesforce Contact ID18 to Contact ID then [Save Fields]

- Select [Edit] to modify Data Extension settings
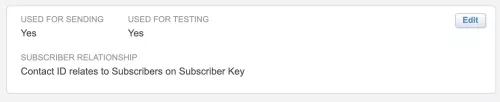
- Select USED FOR SENDING and USED FOR TESTING
- Select Subscriber relatinship dropdown - [CONTACT ID] relates to Subscribers on [Subscriber key]
and Save

Move your Data Extension to the correct folder
- Click on Subscribers > Data Extensions
- Locate your Data Extension (DE) and click the checkbox next to the title
- Then select the [Move] button at top of the page
- Select to move the DE to the Salesforce Data Extensions folder

- Select [Ok] button
Splitting your Data Extention into 2 Randomized DEs
- Locate and click on your Data Extension
- In the top right of the page, click the SPLIT button
- Select Add Data Extension
- Select Add Remainder
- Change your Data Extension size to 50%
- Name both data extensions as desired
Click [Save and Build]
